Sunday 22 April 2012

Shake down sail


Halyards:
I was up with the sparrows on Saturday.  I needed to change the halyards before I could consider raising a sail.
I took advice from Steve's 'Papilon Blog'  and sewed the old and new halyards together and then pulled the old halyard through.
Fitting the Genoa into the furling gear was a pain in the stern,  The top bearing block got stuck on the pop rivet heads and did not wnt to go up or down! Eventually I freed it and after putting some grease in the runner and ensuring that I had a run up for ever set of rivets, the Genoa was raised and furled.
Bob:
While I was struggling with the roller furler, 'Big Easy' Roger pottered over in his tender to say hello. after a brief chat Rog headed back to Big Easy and I continued effing and Jeffing at the fore-stay.  I heard some one call my name but could see anyone.. then I heard it again and realised it was Rog but I couldn't see him.  That's because he was bobbing about in the water with his life jacket inflated.   I jumped in my inflatable and paddled to his aid.  Unfortunately his boarding ladder had parted company with the boat dropping poor old Rog in the Ogin.  I got him back on board and went to get him some dry clothes from Ciao Bella.
A couple of lessons learn't here..

  • Always wear a life jacket / Buoyancy aid - Well done Rog, I tend not to as they live on the boat but I shall start wearing my dinghy buoyancy aid while ferrying backwards and forwards.
  • Keep some warm dry clothes and a towel on the boat for such emergencies as it gets cold pretty darned quick when wearing wet clothes.
  • Not mentioned previously but Big Easy has twin guard rails which makes impossible to clamber over the coamings, I would remove the lower one.

We're off:
Once I had the sails on and worked out what went where it was time to give her a go.  I had a quick radio check with Roger... Only about 25 metres but at least we know we are both able to transmit. I then slipped the mooring and headed towards to middle of the harbour.  Just then the peace was shattered by a particularly nasty shower,  the rain came down and the wind picked up making Ciao Bella broach.  I tried to furl the Genoa but the furling line had dropped out of the drum and got tangled.  I let the sheet go and headed for open water. Once the wind died down I went forward and untangled the furling line.  I suspect that there is something missing from the furler but for now I can control the way it reels up by keeping some tension on the line while I unfurl the head sail.
After a few tacks and Gybes in the harbour I decided the head onto Studland. EDSC where having a meet there with lunch in the Banks Arms.  Ciao Bella felt fantastic as we sped our way over there.  The Nasa Duet worked a treat, showing the difference between speed through the water and speed over ground.  Fighting nearly 2 knots in the swash and then being carried by 1/2 knot along the training wall.   
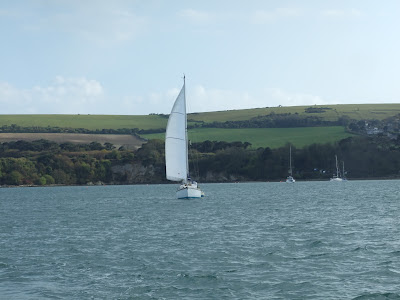
Now in fairly  calm conditions, see picture above,  Ciao Bella was making 6 knots most of the way even while towing the tender.
Ciao Bella moored with other EDSC boats.

First mooring:
I was on one of the Banks Arms visitor moorings by 2pm, a touch less than an hour after saying Cheerio to Roger. That's not bad progress. The Banks Arms moorings are a doddle, They have a great big ring sticking up at deck height which is easy to grab hold of and get a line through.
The picture above was taken from Joe's Cafe, I've never stopped there as I'm usually on route to the pub but it does look like a great place to while away some time.  Onto the Banks Arms  and I met up some of the chaps and chapesses from the club.  I had a fab Blue Vinny ploughman's, Blue Vinny is Dorset's answer to Stilton; not as strong but very tasty, and a couple of beers.


The return:
Back on the boat and another shower started, I took refuge in the cabin and was instantly glad that I wasn't making my way through the moorings.  The wind picked up and Ciao Bella swung violently on the mooring. All the surrounding boats were doing the same, switching ends at speed.   The shower was over as quick as it started so after surveying the sky's I slipped the mooring glided back to Poole with the breeze blowing gentle on the port rear quarter.   Much slower on the way back 3 to 4 knots but picking up when I rounded the training wall and reached back to the entrance.
I had only needed to use the engine a few times for manoeuvring but thankfully it started on cue every time.
I have to say, it's nice to be blogging about sailing rather than fixing :~)  Here are a few more pics, just for the sake of it.
Marker for the end of the training wall

A selection of EDSC boats


After the heavy shower

Southerly 35 - An EDSC member

Elizabethan 29 - An EDSC member


HM Customs

Amelie Rose - Hungry sailors fame.


Saturday 14 April 2012

She's in part 2

Des came up trumps today, bringing the mighty Land Rover round to tow Ciao Bella down to Baiter park.
We took our time raising the mast and fitting the standing rigging as I hadn't done this before. All went well bar getting the back stay tangled in the spreaders.

I wasn't sure there would be enough water at Baiter to launch but by 5:30 she was afloat, a full 3 hours before high tide.
The outboard started first pull, I motored to a safe spot, dropped the anchor a recovered the trailer. Des cleared up on land while I motored to the mooring.

So first trip of the year.. 25mins on the motor. The rigging is in a poor state. All the running rigging needs replacing and the standing rigging needs new Clevis pins. Regardless, it was great to be out on the water.

She in

More to follow:-)

Sunday 8 April 2012

It's curtains for me

Ok, so I lied, I just couldn't let it lie.  I had a spare few minutes so I made some curtains.  I've only done two and have six left to make but you have to keep chipping away.


The cables in the shelves won't be left like that. I have some mini trunking left over to put them in. Better go before Mrs Ciao Bella catches me doing boaty things  :~)

Saturday 7 April 2012

You can't rain on my parade

The end is definitely in sight.  Today, despite the best efforts of the weather, I managed to get the anti fouling on.  While I was scrubbing the hull and slapping on the poison, John was inside finishing off the electrics... That him peering out at you. 


The rain held off for most of the day, but as I got to the last quarter it started to rain properly.  One of my neighbours was around at the time and he fortunately had some canvas tarps that we draped around the unfinished area. To stop the drips running across the area that I wanted to paint we put some tape along, you can just see it in the picture below which made the water drip off rather than run under the hull.


To stop the drips running across the area that I wanted to paint we put some tape along, you can just see it in the picture below which made the water drip off rather than run under the hull.


 So a fruitful day,  The anti fouling is finished, the electrics are finished.   I also ordered the exciter coil for the pain in the ar5e outboard, £35 from Holes Bay Marine including p&p.There are still some small jobs to do but for the sake of my sanity, wallet and marriage I am not doing any more this weekend :~)

Ciao Bella ;~P

Engine woes and odd jobs

After yesterdays excitement at seeing a regular blue spark from the Tohatsu I launched into stripping the carb and giving it a good clean.  Plenty of carb cleaner and blown through with compressed air. I assembled it back on the engine and then  drained the fuel tank and refilled with fresh fuel
I was fairly confident that it would start.  Not a hope, The spark that I saw last night was when it was dark, in daylight there was no visiable spark I resigned myself to the fact that it must be the exciter coil... there's nothing else to change. 


I had been worried about removing the flywheel as I'd heard you needed a special tool but after a quick inspection I could see how to do it.  The Crank thread sits proud off the flywheel once all the gubbings are removed. I drill an ali plate so that I could screw through to the flywheel with machine screws and then wound some nuts down onto the plate to draw the flywheel off the shaft.  Once tight I had to give it a tap with the end off the ratchet and it sprung off the crank.
The exciter coil is the yellow one, the other is the charging coil.  I'll order a new coil on Tuesday from Holes Bay Marine. If it doesn't work after that I'll eat my hat.
I also did a bit on the electrics today.  I no nailed a piece of mini trunking across the deck support to keep the nav light cable tidy.  Where the Port and Starboard lamp cables meet I have joined them together in a Geewizz ip67  junction box.

The stern light needed remounting as the bracket it was on pointed down and also made it impossible the change the bulb as it fouled under the rail.  I cut a piece of hardwood to the right angle and screwed a 9mm ply plate across to allow the lamp to be screwed to it.  I then drilled an 8mm hole in through the hardwood to allow the cable to exit cleanly.  Getting the cable down through the pushpit rail was a nightmare and took far too long. I had to open up the hole through the deck, I could only do this by taping the trigger on the drill so that it was permenantly on, then with absolutely outstretch fingers I drilled through. I enventually forced it through so that's another job jobbed.

Thursday 5 April 2012

A spark of hope.

I picked up a new coil for the outboard today,  The good news is that there is now a regular blue spark when I pull the cord.  The bad news is that it still won't start.   I take heart in seeing a spark as now I just need to find the mechanical trouble. Fresh petrol and a carb clean will hopefully sort it now... He said hopefully :~)

I also ran a new cable up the mast for the steaming light.  I had to drill the rivets out of the mast foot as my first attempt, last week, ended up with the old cable inside the mast and not joined to the new cable.  I eventually fished the old cable back to the bottom of the mast so I could attach the new cable.  Anyway the cable is now wired into the masthead lamp at the top and into the connector at the bottom.  I need to grab some very large ali rivets to put the foot back on.  A job for tomorrow.

I picked up 2.5l of Anti foul today as well so as soon as the weather is suitable and I feel like covering myself in poison I'll crack on with that.

Bugger, just remembered that I'd promised John that I'd put up the mini trunking ready for the electrics... I'd better get up early in the morning.

Wednesday 4 April 2012

Rubbing strakes finished

That's another job ticked off.  Rubbing strakes sanded down and coated with Cuprinol.  This just leaves Antifouling, Outboard repair and repair the tender as the only big jobs left to do.  The rigging needs checking over but if the worst comes to the worst I can do that once afloat.  I've also got time to titivate the interior a bit so will be making curtains and panels covered in vinyl just to make to interior a nicer place to be.
The exterior will have to remain as is until next winter but really needs doing.  The paint on the hull and particularly on the deck is pretty ropey but so what... I'll be sailing :~)

Tuesday 3 April 2012

A bit more

I'm running out of steam (No pun intended).  Today was the last of my holiday for getting Ciao Bella ready but with no hope of getting her in the water imminently I have backed off on the pace.
This morning I had a look at what to do with the battery box.  I mounted a sheet of ply under the cockpit floor. It's tight for space under there. I wanted to have the sheet at the same level as the floor but there wasn't room to get the box in so it had to sit about an inch lower.  I'm happy enough with it, there is still space at the side to store paddles, boat hook etc.


I also removed and refitted the the rubbing strakes on both sides, bedding the top edge in a bead of sikaflex.  I finished off the starboard strake using some of the freecycled hardwood.  I had a piece of what looks like teak which has blended in reasonably well with the Iroko.


I took the sharp edges off with the sander, they are looking pretty good now and are ready for some 'it does exactly what it says on the tin'.
The last wee job I did today was to remount the starboard rear stanchion... easy enough you might think.  I took it off with the help of number one son, clean it up; squished some sikaflex around the base and bolted it up. Popped out side to admire my work only to see that the hole for the guard wire was pointing the wrong way.  Back under the rear quarter berth, unbolt; remove; more sika flex; position correctly and bolt up.  Fabulous except for the extremely black hands  :~(
Mrs Ciao Bella found some blue and white material that I can make curtains out of so that another job that can be done for zero cash.. result.

Sunday 1 April 2012

Well sparks steam

Saturday was a busy day.  I got up early (ish) and put together a list of jobs to complete.  Foolish I know.


The amount of filler on the starboard side was outrageous, fortunately Roger lent me his belt sander. This piece of kit is more like one of the four horse men of the apocalypse than a tool.
 It ripped through the filler in seconds and I had to be careful not to turn Ciao Bella to dust.
 I linished the filler level with the deck moulding then chiseled the lower chunks off with a hammer and wood chisel.
 The strakes went on easily with my new found techniques.  I have enough wood to finish but will source some more to do the last bit in one length.
 Ed, the previous owner sent me a text to say that he'd raised the lip of the outboard well by 50mm to accommodate his engine. I decided to reinstate the original height.  Unfortunately it's still not low enough for my short shaft so I will have to bite the bullet and get the Tohatsu sorted. I Daren't look at the bank account.
 I cleaned and refitted the rear fair leads, In the mean time I'd enlisted the help of one of my friends  to attack the electrics.


John was a star, raiding his own supply of goodies to bring the electrics up to spec.  The wiring in the boat was in a awful state, some of it had shown signs of it overheating in the past.  All cables are being replaced.  The main switch has been thrown away in favour of an MCB (pictured)
 John also supplied trunking and conduits, the battery box will be fitted to a platform under the cockpit.
The only items on the list not ticked off were the rear stanchion... Ran out of time, and the pushpit rail which didn't need removing in the end as I move the Nav lights to the side of the cabin.  This was for two reasons. 1) it's easy to run the cables here and 2) The way they were positioned it was impossible to change the bulbs. I still need to reposition the stern light as that has the same problem.
 All in all a good days work. I repaid John by supplying food and ale, John then pulled out a bottle of 12year old malt.. The rest is a blur.